
Interior design construction bridges the gap between aesthetics and real-world functionality. It’s the process of transforming a room’s layout, finishes, and systems to create a space that looks intentional and performs well. Whether someone’s renovating a kitchen, reconfiguring a bedroom, or opening up a living area, interior design construction requires thoughtful planning, skilled trades work, and smart coordination between multiple professionals. Unlike pure interior styling, which focuses on furniture and decor, interior design construction involves structural decisions, material selections, building permits, and actual construction labor. Understanding the phases and key decisions involved helps homeowners make informed choices and avoid costly mistakes.
Key Takeaways
- Interior design construction encompasses structural work like framing, electrical, plumbing, and flooring—distinctly different from styling and requiring permits, building codes compliance, and licensed professionals.
- The planning phase is critical: defining scope, layout, material selections, and identifying structural constraints early prevents expensive mid-project changes and costly errors.
- Load-bearing walls cannot be removed without a structural engineer’s assessment and a properly sized beam, while non-load-bearing walls still require permits and professional coordination with electrical, plumbing, and HVAC systems.
- Hiring qualified contractors and designers with verified licenses, references, and detailed contracts—including contingency budgets of 10–15%—reduces misunderstandings and protects against unexpected costs.
- Interior design construction projects require clear communication throughout, careful change management, and proper documentation (permits, inspections, warranties, as-built drawings) for future maintenance and resale value.
What Is Interior Design Construction?
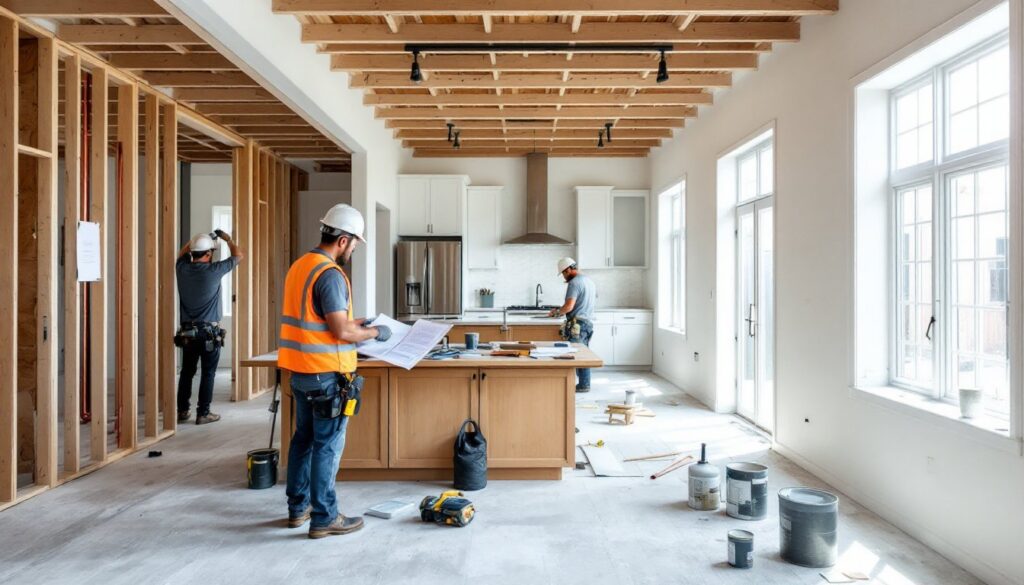
Interior design construction is the building and renovation work that creates the bones of a beautiful interior. It encompasses everything from framing walls and installing flooring to running electrical and plumbing systems, finishing drywall, and applying paint or tile. It’s different from interior design styling, which happens after construction ends, choosing furniture colors, arranging layouts, or adding decorative accents.
A well-executed interior design construction project takes into account building codes, structural integrity, safety, and the client’s functional needs. It requires coordination between architects, contractors, electricians, plumbers, and finish carpenters. Some projects are purely cosmetic, new flooring, paint, and light fixtures require no permits. Others are structural and demand licensed professionals, permits, and inspections. A homeowner who understands this distinction avoids overpaying for unnecessary permits and, conversely, won’t skip critical approvals that put the home at risk.
Key Phases Of An Interior Construction Project
Planning And Design Development
The planning phase sets the tone for the entire project. This is when a homeowner (often working with a designer or architect) defines the project’s scope, style direction, and budget. Key decisions include room layout, traffic flow, lighting placement, and material finishes. A designer will typically create a space plan, electrical and plumbing layouts, and a material palette, paint colors, flooring type, wall treatments, and fixture selections.
This phase also involves site measurements, assessing existing conditions, and identifying potential constraints. Is a load-bearing wall in the way? Are ceiling joists adequate for a chandelier? Does the electrical panel have capacity for new circuits? Catching these issues early saves time and money later.
Permitting And Pre-Construction
Once the design is locked, permitting begins. Not all projects need permits, repainting a bedroom doesn’t. But any structural wall removal, significant electrical or plumbing changes, or modifications that affect room dimensions typically require permits and inspections. Permit requirements vary by jurisdiction, so homeowners should check local building departments.
Pre-construction also means securing contractors, ordering long-lead items (custom cabinets, special fixtures), and scheduling the work. Contractors will conduct a detailed walkthrough, take measurements, and place orders. This phase is the last chance to make changes without major cost impacts, changes during construction multiply expenses and timelines.
Essential Elements To Plan For
Structural Changes And Layout
Room layout is the foundation of interior design construction. Opening up walls creates flow but removes storage, privacy, and structural support. Before any wall comes down, a structural engineer must verify it’s not load-bearing. Load-bearing walls carry the weight of the structure above and cannot be removed without a properly sized beam and support posts, a job for a licensed professional, not a DIYer.
Non-load-bearing walls can be removed, but it still requires permits, and contractors must protect existing systems. Running electrical, plumbing, and HVAC ducts through walls affects layout decisions. A designer should coordinate these early. For example, moving a sink requires new plumbing and possibly a new drain stack, expensive if cabinetry or finishes are already set. Similarly, adding a bathroom fixture demands new electrical circuits that must meet code: the electrical panel location and circuit capacity matter.
Floor plan changes also affect material quantities and labor costs. Removing carpet for hardwood requires subfloor inspection and potential leveling. Adding tile means waterproofing and proper underlayment in wet areas. Structural changes, reinforcing joists, sistering beams, or adding posts, require permits and inspection. Being clear on layout early prevents expensive mid-project pivots.
Working With Contractors And Designers
Hiring the right team makes or breaks a project. A qualified designer understands building codes, material compatibility, and realistic timelines. They communicate specifications clearly to contractors, reducing misunderstandings. When hiring contractors, check references, verify licenses and insurance, and ask for detailed bids that break down labor, materials, and timelines.
A contractor should walk through the space with a homeowner, ask detailed questions about functionality and style preferences, and flag potential issues early. Red flags include vague bids (“around $15K”), reluctance to provide references, or pressure to start immediately without a formal contract. A solid contract includes scope, timeline, payment schedule, warranty, and procedures for changes.
Communication during construction is critical. Weekly check-ins keep everyone aligned. If a homeowner wants to change a fixture mid-project, understand the cost and schedule impact before approving. Small changes compound, moving an outlet, upgrading a finish, or swapping materials can delay timelines and bust budgets. That said, problems do arise on-site. Discovering rotted framing or unexpected plumbing often means scope adjustments. Professional contractors anticipate these and build in contingency: homeowners should reserve 10–15% of the budget for unknowns.
At project completion, a walk-through with the contractor identifies any punch-list items, small fixes or adjustments, before final payment. Request proper documentation: permits, inspection sign-offs, warranties on materials and labor, and as-built drawings if major systems changed. These records are invaluable for future repairs and resale.